Wednesday, November 16, 2011

Thursday November 3, 2011

We started at Pineville again and fished the same riffles we did the previous morning. I figured, what the heck, and fished the same married wing that I started with yesterday as well. About 45 minutes later As I was working my way downstream, I saw some branches move in the woods on the far side of the river. I didn’t see anything so I kept casting and working my way downstream.
Maybe 15 minutes had gone by, and about 8 Turkeys show up on the bank directly across from me!! They stood there for a minute looking at me like they were trying to figure out their next move. One of them took the lead and walked upstream a few feet, hopped of the bank and flew across the river about 15ft-20ft away from me, and landed on the other side.
I had one half hearted tug after working through one time so I decided to go all the way down the south side of the river and start below the bridge. I checked out the depth near the abutment and it was rather deep, so I went around it and hopped in on the downstream side.
I worked downstream through the flat water, hit the riffles and kept going. The changes were subtle, but noticeable. The sort of thing you have to see firsthand rather than from afar. I learned a few things and noticed some people I knew on the far side, so I waded across and watched one of them land a nice steely. We had a nice conversation about the changes in the river, the amount of people, and of course the steelhead…..and maybe a few other things as well. I hopped in below them after I asked if it was ok and enjoyed the rest of the morning session. Some kings were around sliding here and there, and it was fun to watch. I didn’t see any steelhead, not did I hook any, but I found two nice floats!! I think my collection is up to about 10 now. After lunch I took a stab at trying to find my buddy Geoff, and new just the place to try. My hunch was close to being right and a quick phone call confirmed that it was him upstream of me. We talked for a bit and decided to get back to fishing!! I had two plucks in the run and Geoff had two as well. I kept going downstream and he tried again with another fly and it paid off!! I wasn’t there when he landed it, but I could hear the commotion. After that I decided to head to 2A to meet up with my Dad and Dave for the rest of the evening. The water was a bit shallow and didn’t have much push either so 2A was better area for swinging. I told Geoff where I was headed and took off down the road. I fished some open water here and there around the big holes and was even able to work through the old abutment. Geoff was there as well, but neither one of us could earn another tug. Who knows how many fish moved to take a peek though!! Maybe tomorrow.

Friday November 4, 2011

We all went down to Douglaston in the morning with the hopes of fresh chrome but it was not to be. I forgot how depressing the low flow was when down at that section of river. That’s just my opinion though. People everywhere didn’t help. I counted 18 people in the meadows alone with another 10 above and below that run. Heck, if I want to fish in a crowd I’ll head to Altmar. So that’s what I did!! I made it back to the DSR lot at 9:30, hopped in my pollution machine and headed to the land of dark horses to do a little reconnaissance to see how the river changed from last year. Even though I didn’t hook anything that morning it was nice to be able to fish the tailout of the schoolhouse and the tailout of the wires. I saw plenty of fish hooked and the atmosphere was rather cool, with a large group being guided. Mission accomplished, time for lunch. I met up with Dad and Dave and they had left the DSR as well due to the crowds and lack of push in the flow. They had gone to 2A bridge, but didn’t hook up with anything, although they did see a few hook ups. We all decided to head to the Pineville area for our last evening of fishing. It was a good choice because it seemed the fish were fairly active and some fresher fish were moving through as well. It was a little crowded up top so I headed downstream to the next run and found some room. The guys across stream were hooking up consistently floating beads, sacs, and flies, but I couldn’t get a touch. I switched flies and sizes of flies a couple of times but no tugs for me. It was about an hour before we had to head back to the truck, so I went back up to where Dad and Dave were. Dave had lost 2 steelhead with his single handed rod and nymphs and my Dad didn’t get touched swinging. I hopped in above Dave and put on my cheater fly….tungsten conehead purple Swarn-a-Bugger with a pink bead in front of it that was not pegged. I had on a 3.9 ips polyleader and the combo worked pretty good. A bit ugly to cast and turnover with a mid belly line, but it worked.
On about my 12th cast or so I felt a nice hard thump that pulled the loop out of my fingers. The rod was throbbing as the steelhead came up to the surface and flew up into the air. After the splash landing he took off downstream a short ways, stopped and started coming upstream right to my feet. He got into the shallows and I was ready for the next run. He took off again, running and slashing at the surface as he went downstream.
After that the fight was close to shore in a deep slot. He rolled around and changed direction a few times, but he was about tuckered out so I lead him shore and I landed him in the shallows. Dad and Dave were ready with the cameras so they took a few quick shots and Mr. Steelhead was on his way back to deeper water.
It was a little past 4:30 at this time and I said, “Hmmm, end on a good note or fish a little while longer?” My Dad said, “End on a good note.” So that’s what I did. I watched Dad and Dave fish some more and saw some steelhead jump and splash, but that was it for the trip. All in all it was another great time in Pulaski, NY fishing the mighty Salmon River. We had a wonderful time at Whitakers cooking out for lunch and dinner, having some drinks in the evening, and sharing some laughs. It was also good to see old friends, make some new ones and share time on the river with all of them. Tightlines till next time!!

Thursday, September 22, 2011

Time to Go!!

Well almost.....a few more days and it will be a week on the Salmon River with family and friends. I always love this time of year and what is to come, except leaves in the river which make it a PITA to swing a little sumpin. sumpin. The river is cooling little by little and the fish are getting closer and closer to running the gauntlet. Days are getting shorter and the nights are getting longer so the various species in and around the river know what's coming. The feed bags are on so to speak and I'm hungry as well....even though I don't look like it.

I'm tired of looking at flies in boxes and in the vice, online, catalogs etc.... They need to get wet!! Nothing like moving water to fill out the recipe of each and every fly. Hopefully some will catch, but I know it will be a learning experience like always. Especially when the kings are in the river. They are definitely a challenge when you fish a fly above them and not through them. It almost seems futile to even to try after a while, but I tell myself they are tougher to get on the swing than Steelhead. If swinging for steel isn't a numbers game, then swinging for kings is for hard heads like myself. I guess it's a confidence thing and not catching anything isn't all that bad when you understand what you are trying to accomplish. I guess that's why I find it so rewarding.

Smaller flies seemed to work better for me and my Dad last year, compared to all the big flies everybody thinks you "need" to fish. Well it's personal choice so I do both. But for now I'll stick to writing about the smaller flies. When I say smaller I am talking about size 4-6 up eye salmon hooks, even size 8. You don't always need big flies to get big fish to move for them. Presentation, presentation, presentation!! Finding un-molested fish is also a big part of the game.

The flies that one would typically use for Atlantic salmon are perfect for the Salmon River. Hairwings, mixed wings, and strip wings are a good place to start. I like to reference "Flies for Atlantic Salmon" by Dick Stewart and Farrow Allen for inspiration. I also like to reference "Flies for Steelhead" by Dick Stewart and Farrow Allen as well. Sometimes I like a pattern but change the colors to what I have previous success with in the Salmon River. Have fun with it and don't stress yourself. Sometimes letting go is the best way to get a grip on what is going on around us.

Afternoon Delight, Signal Light, Coal Car, Purple Peril, March Brown, Copper Killer are great flies to try out this season. Maybe you'll find a little secret fly of your own that not many people use or even have in their boxes. Don't be afraid to experiment with synthetics as well. I've always liked a combination of both in a fly for fishing. Kind of like the best of both worlds.

Wednesday, August 24, 2011

Between Now and Then

Now is the time of year to check all of your gear for the upcoming season, because nobody likes trying to run to the shop/store for last minute items and fixes.... especially when the fish are in and the bite is hot.

I am going to go over some things I like to do before it's "too late." No particular order however.

Exterior Gear
Waders - Time to check them for leaks and make any necessary repairs. Check them like a tire. With the help from my dad, we use a shop vac and blow air into waders that are turned inside out. Spray an extra soapy solution on the seams or any problem areas and look for small bubbles. Make note of the area and dry the waders. Apply your choice of glue with a plastic knife or a pospicle stick to spread it evenly. For larger tears or punctures, follow the manufacturers instructions.

Wading Boots and Cleats - Make sure they are in good shape and if some mending is required, head to a local shoe and boot repair store for a fairly cheap fix. Make sure the studs/cleats are not rounded or smooth and replace as necessary.

Breathable Rain Jacket - Check for any tears or rips and repair as necessary. I like to clean my jacket by hand with a mild, un-scented dishwashing soap and let it air dry after rinsing. I am not a big fan of using aftermarket sprays for waterproofing. They work, but not long enough in my opinion.

Fishing Bag, Vest, or Sling Pack - I like to empty everything out of my fishing bag to see what I need to replace and also vacuum out any loose items that always seem to collect in the bottom. Again, check all seams and zippers etc. to make sure everything is in working order.

Gloves and Hats - Usually not a problem, but sometimes a quick fix can be made with a sewing kit.

Wading Staff - Make sure it is not bent too bad and will hold up to another season of punishment.

Net - Check for any holes and repair as necessary.

Glasses - Check the frame and lenses for any cracks. Make sure the screw in the hinges are tight as well.

Tackle
Rods - Look over your rods carefully. Check the blank and ferrules for nicks or any signs of failure that could happen later down the road. Inspect the rod wraps for any cracking and make sure the guides are in line and in good shape. Run a cotton swab through your guides to check for burrs that may damage your fly line. Make sure the reel seat is functioning properly and clean out the threads if they are dirty. Now is a good time to clean the cork grip as well. Soapy water, a wrag, and some elbow grease should do the trick.

Reels - Take all the line and backing off and check everything possible. Make sure working parts are moving properly and are lubed with the appropriate substance. Since there are various types of drag systems, follow your owners manual accordingly or take it in to the shop and have a professional look it over. Run a cotton swab over the line guard and any parts the line may come into contact with and check for burrs that could damage your line.

Backing - I like to change my backing every two years. When I don't change it, I make sure to re-tie my "backing to fly line" knot. Usually an albright knot coated with aquaseal or pliobond.

Fly Line - Hopefully you've taken care of it and cleaned it a few times during the last season. If not now is the time for a good cleaning. Check the welded loops at both ends to make sure they are not cracking. If the lines don't have welded loops verify the loop system is intact and repair or replace as necessary. Lately I have been going with braided loops nail knotted to the line and covered with aquaseal or pliobond.

Tippets, Leaders, and Sinktips - Pull some tippet out of your spools from last year and pull hard on it. If it breaks, trash it, and replace. If it holds you should be good to go. I like to replace any and all leaders regardless if they are good or not. Check your sinktips for any damage and make sure the loops at both ends are in good shape. Now is a good time to make sure they are labelled properly in your wallet so no time is wasted on stream.

Flies - Clean out your fly boxes and don't keep any flies that are severely rusted. Check them all for sharpness and crush the barbs as necessary. Make note of any flies that will need to be replaced. Now is a good time to re-organize your flies so they can be easily found while on stream. Make sure the stinger line on your stinger flies is in good shape too. Check your supply of tube fly hooks as well.

Other Goodies - Check your supply of split shot, line indicators, back up braided loops. I like to keep a tube of loon uv glue in my bag for onstream fixes. I also keep a small knife with me in case my feet get tangled in old line in the river or on the trail. Make sure it is sharp, it will come in handy. A set of strong pliers is always good to have. I like to have a small towel in my bag for wet hands after landing fish. Gotta have TP....travel baby whipes are perfect! Make sure you have your license as well!!

Monday, August 15, 2011

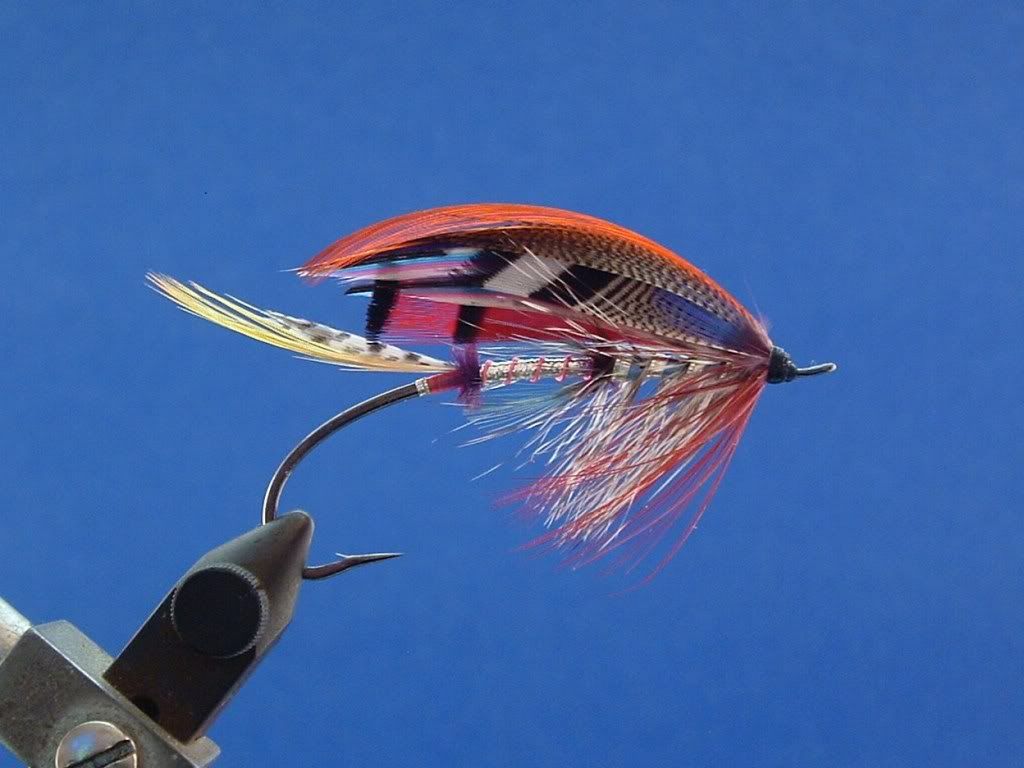
Childers - Pryce Tannat Version

Childers
Hook: Dave McNeese Blue Heron - size 2
Tip: Small oval tinsel - silver
Tag: Pale Blue Floss
Tail: GP Topping and Indian Crow (Orange Weaver is shown)
Butt: Ostrich - black
Body: Godlen Yellow Floss, Orange and Fiery Brown Seals fur in equal sections
Ribs: Flat Silver Tinsel and twist (Silver Lace is shown)
Hackle: Badger Hackle - Lemon Yellow (Yellow grizzly hackle is shown)
Throat: GP breast feather followed by Widgeon
Wings: A pair of GP breast feathers back to back; married strands of scarlet, blue, orange, and yellow swan (turkey is shown), bustard, Florican (left out), GP tail, cinnamon Turkey, mottled grey Turkey tail
Sides: Barred summer duck strips
Cheeks: Blue Chatterer (asian kingfisher is shown)
Topping: GP Crest
Horns: Blue and Yellow Macaw

Thursday, August 4, 2011

The Steelhead are in.........

My head that is!! I am usually thinking about them year round, but during this time of year, the thoughts seem to become stronger since "the season" isn't too far away. Tying flies is one way I try to harness those thoughts and give them some sort of direction.

I like to look at my flies from the last season to bring back memories and to also give me an idea of what I need to tie for the upcoming season. Some flies are solid producers, while others just didn't seem to work. Others have worked before but for some reason didn't work last season. Why? I like to think it was my fault for not being in touch with my surroundings and not reading the signs. I sure don't think the steelhead, the river, or the weather did anything wrong.

Some flies maintain a spot in the lineup while others are removed, but are not forgotten ....their time hasn't come yet. This frees up some space in the box and gives me a reason to tie "new" flies. Sometimes that "new" fly is a pattern that has been around for 75yrs or more, but I haven't tied it yet. "New" may also mean learning a different style or learning to apply a material in a specific manner. Basically what I am getting at is that many a person has come before me and probably already did this before, so it is really not "new" or "innovative"......just different to me. A breath of fresh air so to speak.

This season I plan to tie more married wings and mixed wings for steelhead fishing. Yeah, yeah.....I'm crazy....why would I take that amount of time to do such a thing? If they worked in the past, they have to work now. The time spent doesn't bother me since time doesn't exist when my mind is focused on the fly at hand. To not fish the fly would be stopping the journey short. If it makes you feel better, I do plan on using substitue materials. I'll save the good stuff for show flies.

I have already fished and have had success with various Spey and Dee flies. Some follow the original recipe while others have the colors changed to my liking. I plan to do the same thing with married wings and mixed wings. Just knowing that I will be showing the steelhead something different than all the typical stuff, gives me loads of confidence. Hopefully I will be able to stay the course, and not fall back and tie on "old reliable."

Some of the patterns I plan on tying are the Childers (almost finished), Butcher, a few Doctors, Black Dog, Green Highlander, Drake Wing, Ghost Fly, and some other are on the list as well.

Thursday, June 16, 2011

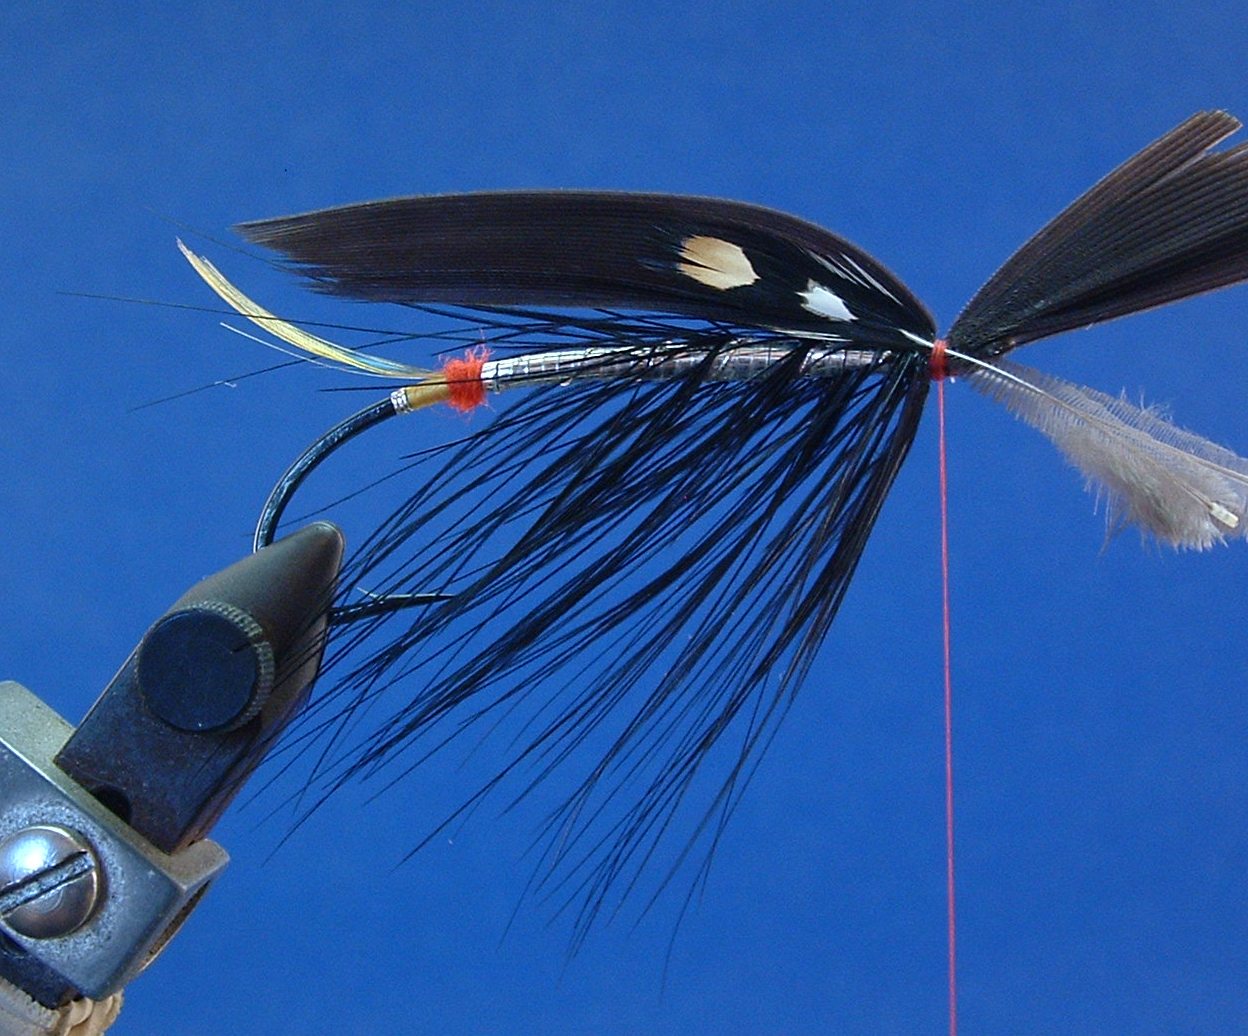
Night Hawk

HOOK: Alec Jackson 1.5
THREAD: UTC 140 denier for underbody, UTC 70 denier for rest of fly
TIP: Small Oval tinsel - silver
TAG: Yellow Floss
TAIL: Golden Pheasant Crest
BUTT: Red wool
RIBBING: Small Oval tinsel - silver
BODY: Medium Flat tinsel - silver
BODY HACKLE: Pheasant Rump – dyed black
THROAT: Pheasant Rump – dyed black
WING: Turkey Tail - Black
SIDES: Jungle Cock nails
CHEEKS: Asian Kingfisher
HORNS: Scarlet Macaw
HEAD: Red Thread


Step 1: Attach your hook to the vise and make sure the shank is parallel to your desk surface. The eye of the hook should not be on an upward or downward angle.


Step 2: I’m using utc 140 denier thread to form the underbody. Attach the thread just behind the return wire that forms the eye. DO NOT WRAP OVER THE RETURN WIRE AT THIS TIME.


Step 3: Un-spin the thread so it will lay flat on the hook shank and work your way back to the rear of the hook with edge to edge wraps. Stop short of the hook point and work your way forward. You will have to un-spin your thread multiple times while making edge to edge wraps. Again, DO NOT WRAP OVER THE RETURN WIRE AT THIS TIME. We are trying to build the underbody up for a smooth transition in this area.


Step 4: Work your way back to the rear of the hook with edge to edge wraps, except this time, stop 4-5 turns short of the first stopping point. Work your way forward again with edge to edge to wraps. Repeat this process, stopping 4-5 turns short of your last stopping point until the underbody is built up enough for a smooth transition onto the return wire.

Step 5: At this point have your 140 denier thread at the return wire. Attach 70 denier white thread onto the return wire and wrap back over the 140 denier thread to tie it off. Stick with edge to edge wraps and work your way back to the rear of the hook until the thread is directly above the point of the mid-point of the barb.


Step 6: “THE TIP” Select a strand of small oval tinsel and attach it to the far side of the hook shank advancing the thread forward rather than rearward. Make 3 turns of small oval tinsel and tie the tag end off on the far side of the hook shank. Making edge to edge wraps, advance your thread forward so it is located above the point of the hook or slightly ahead. This will be our tie in spot for the floss tag. Also trim the tag ends of the tinsel so they stop just shy of this spot. This way we will be able to hide them in the tag, tail, and butt of the fly.


Step 7: “THE TAG” Select a strand of yellow floss and split it in two. I find it easier to tie the strand onto the hook shank, un-spin it slightly, and use a bodkin to separate the strands. Untie the floss to fully separate the strands. Select one strand and tie it in on the near side of the hook shank at the spot mentioned in step 6.

Advance your thread to get it out of the way then wrap the floss back to “the tip” and forward over itself. Stop at the initial tie in spot and unwrap your thread until there is only one turn securing the floss strand, then wrap the thread over the tag ends of floss on the near side of the hook. Let the tag ends extend to the return wire if you still have a little room to smooth out the transition. Wrap the thread back over the floss a turn or two. This will be our tie in spot for the tail.


Step 8: “THE TAIL” Select a small Golden Pheasant Crest feather that has a gentle curve. We don’t want the tip of the tail to sit up too high because it will affect the alignment/height of the wing. Strip off the fuzz and some of the fibers at the base of the stem. Apply some wax to your thread (cobblers wax if you have some on hand) and attach the GP Crest to the top of the hook shank. Two to four wraps are fine and they do not need to be super tight death wraps. Just firm enough to keep the tail in place. Select a small Asian Kingfisher feather and strip of the fluff at the base of the stem. Un-wrap 2-3 turns of thread and mount the kingfisher feather so it lays flat over the tail. Wrap the thread forward using edge to edge wraps binding all tag ands to their respective sides of the hook shank. Your underbody should be finished at this point or darn close. Wrap the thread back to the tail to prepare for the butt.


Step 9: “BUTT” Select some red wool and spin a small amount onto your thread. Make one wrap of dubbing toward the tail, then make the next wrap forward crossing over the previous one….”X” wraps basically. Do this until you create a small “ball” on the hook shank.


Step 10: “TINSEL RIBBING” Select a strand of small oval silver tinsel and attach it to the far side of the hook shank letting the tag end extend just short of the eye of the hook. Wrap your thread forward then wrap the tinsel forward making 5-6 evenly spaced ribs. I used six turns of ribbing, so at the third turn I used a fine tip marker to mark the body hackle tie in spot on the bottom of the hook shank. If you use five turns, make your mark at the second turn of ribbing. Un-wrap the tinsel and then the thread until the tinsel is being held in place by 1 or 2 turns of thread.


Step 11: “BODY TINSEL” Select a long strand of medium flat silver tinsel, prepare and tie it in as shown in my sketches. Wrap your thread forward with edge to edge wraps, binding the tag ends of material, and stop short of the eye of the hook.


Step 12: “BODY” Wrap the flat tinsel forward with edge to edge wraps and nice firm pressure. This is where all the work done to make a smooth underbody pays off. When you get to the mark we made for the body hackle tie spot, stop and attach hemostats to the tip of the flat tinsel and let it hang.


Step 13: “BODY HACKLE” Select a long fibered Ringneck Pheasant rump feather dyed black, and stroke the fibers downward so only the very tip is sticking out. Grab the flat tinsel, un-clamp the hemostats and use the flat tinsel to attach the pheasant rump feather to the bottom of the hook shank. Continue the flat tinsel forward until you finish the body. Make sure there is wax on your thread, tie off the flat tinsel and trim the excess.


Step 14: “Ribbing” Grab the small oval tinsel and rib the body with the number of turns you have selected. When you get to the body hackle make sure the tinsel goes in front of the stem so the hackle will be wrapped along the rear edge of the ribbing. Tie the oval tinsel off at the front of the hook and trim the excess.


Step 15: “BODY HACKLE” Wrap the body hackle forward following the rear edge of the tinsel, tie off at the front of the hook and trim the excess stem.


Step 16: “THROAT” Select a long fibered Ringneck Pheasant rump feather dyed black, and strip off one side of the fibers. While looking at the good side of the feather, strip off the fibers on the left side. Stroke the fibers downward so only the very tip is sticking out. Tie the feather in by the tip and wrap the hackle 2-3 turns. Tie it off and trim the excess stem.


Step 17: “BODY HACKLE and THROAT” At this point use your thumb and forefinger to stroke the fibers downward so they won’t interfere while mounting the wing. A little spit can help control the fibers and keep them in place for the time being.


Step 18: Since the head calls for red thread, I switch to at this time. Wax the thread then attach it to the hook shank, wrap over the previous thread and trim it off.
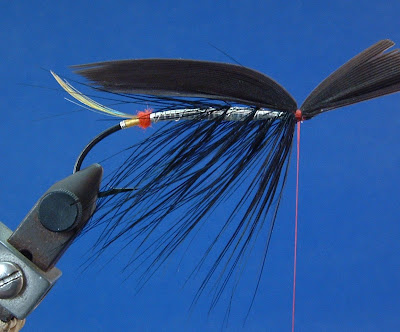


Step 19: “WING” I am using black Turkey Tail feathers, goose would be a good substitute. Please take a look at the drawings from Pryce-Tannat and take notice of the subtleties. I am going to mount the wings like figure 1, but I want them to lay lower like figure 3. I chose to use approximately 24 fibers for each wing. After clipping the strips of fibers from their respective sides I put them back to back so the good sides are on the outside and the longest fibers should be the top of the wing. Now I use my fingers to align the tips to match the curvature of the tail and also “hump” wing slightly. Giving the wing this slight hump or arc will help to set the wing low and also helps to give a slight “bull” at the front edge of the wing.

Before mounting the wing make sure to wax your thread. Holding the wing strips in my right hand, I position them where I want them to be, then use my thumb and index finger of my left hand to hold them in place. You should be squeezing the wings with enough pressure to keep them in place when mounting them….the fibers should not slip. If they do your wings will have the tendency to explode or pop apart. This hold is sometimes referred to as the “Vulcan Death Grip.”

Make the first wrap of thread, but make sure to wedge it between your fingers before going around the hook shank. Make one more wrap and do the same thing. Both wraps should be loose and shouldn’t be compressing the wing at this point. Let the bobbin hang and grab the butt ends of the wing with your right hand. Using the your right hand, start to compress the fibers directly downward. Pull the bobbin done a touch to engage the thread with the wings, still maintaining a firm left grip. Once the thread loops are on the wing and not between your fingers, let the bobbin hang, and use your right hand to further compress the wings. The weight of the bobbin will help with this step. When you have the wings compressed sufficiently, grab the bobbin and pull the thread straight up to set the wing, then make 2-3 more turns of thread to secure the wing. Use your right hand to align the butt ends with the centerline of the shank. At this point you can let go with your left hand to see how good a job you have done.

If the wing is to your liking, put a few dabs of head cement on the butt ends, just ahead of the tie in point. This will help to keep everything aligned, just be sure not to get any on the finished wing. DO NOT TRIM THE BUTT ENDS AT THIS POINT.


Step 20: “SIDES” Select two matching Jungle Cock nail feathers and trim the fibers off the stem rather than stripping them off. Try to leave some little stubble sticking out from the stem. These will act as outriggers to help prevent the stem from rolling while tying it in. Wax your thread then tie the nails on one at a time and let them extend to the middle of the body. DO NOT TRIM THE BUTT ENDS AT THIS POINT.


Step 21: “CHEEKS” Select two matching kingfisher feathers and trim the fibers off the stem rather than stripping them off. Try to leave some little stubble sticking out from the stem. These will act as outriggers to help prevent the stem from rolling while tying it in. Wax your thread then tie the feathers on one at a time and let them extend over the white “eye” of the jungle cock. You can put a little dab of head cement on the stems if you like, but not too much.


Step 22: Use a double edged shaving razor to trim the butt ends of all the material extending past the eye of the hook. Trim them at a slight angle to help build a taper for the head. Take your time with this step, not only because the razor is sharp, but because we don’t want to push any material out of alignment.


Step 23: “TOPPING” Select a Golden Pheasant crest feather that has the same general curve of the wing. Also, try to make sure the topping/crest feather is straight and is not twisted. To get the nice cascade effect, soak a few toppings that look good in warm water for a half hour or so. Take them out of the water with tweezers and lightly flick off the water. Set them on a flat piece of glass and before they dry, separate the fibers with a bodkin. When they fully dry you should have the “cascade.”

Before mounting the topping, hold it up to the wing to establish the tie in point on the stem. Strip off all the fibers below this point. To put a notch into the stem at the tie in point, use the pad of your forefinger as the base and use your thumbnail to make the notch. Take your time with this, because the stem can roll and we don’t want that to happen. Your thumb and forefinger are the best tools and are much better than using pliers.

Make sure you have your thread waxed and mount the topping to the top of the fly. Try to get the tip of the topping to meet with the tip of the tail. Don’t trim the excess stem.


Step 24: “HORNS” Select two fibers from a Scarlet Macaw tail and make sure they are long enough to extend to the rear of the hook. Turkey or Goose dyed red would be a good substitute. You have two options with the horns; they can go straight back and be parallel to the wing or they can criss cross over the top of the wing. I prefer the latter myself.
Make sure your thread is waxed and tie them on one at a time. When you have them situated how you like, make a few more turns of thread and trim all of the excess butt ends.


Step 25: Finish forming the head with the red thread and tie it off with a whip finish. Coat the head with thin cement so it will soak into the thread. After this dries, apply thicker “finish” cement or a gloss coat. Let the gloss coat dry and apply another coat or two.