HOOK: Alec Jackson 1.5
THREAD: UTC 140 denier for underbody, UTC 70 denier for rest of fly
TIP: Small Oval tinsel - silver
TAG: Yellow Floss
TAIL: Golden Pheasant Crest
BUTT: Red wool
RIBBING: Small Oval tinsel - silver
BODY: Medium Flat tinsel - silver
BODY HACKLE: Pheasant Rump – dyed black
THROAT: Pheasant Rump – dyed black
WING: Turkey Tail - Black
SIDES: Jungle Cock nails
CHEEKS: Asian Kingfisher
HORNS: Scarlet Macaw
HEAD: Red Thread

Step 1: Attach your hook to the vise and make sure the shank is parallel to your desk surface. The eye of the hook should not be on an upward or downward angle.

Step 2: I’m using utc 140 denier thread to form the underbody. Attach the thread just behind the return wire that forms the eye. DO NOT WRAP OVER THE RETURN WIRE AT THIS TIME.

Step 3: Un-spin the thread so it will lay flat on the hook shank and work your way back to the rear of the hook with edge to edge wraps. Stop short of the hook point and work your way forward. You will have to un-spin your thread multiple times while making edge to edge wraps. Again, DO NOT WRAP OVER THE RETURN WIRE AT THIS TIME. We are trying to build the underbody up for a smooth transition in this area.

Step 4: Work your way back to the rear of the hook with edge to edge wraps, except this time, stop 4-5 turns short of the first stopping point. Work your way forward again with edge to edge to wraps. Repeat this process, stopping 4-5 turns short of your last stopping point until the underbody is built up enough for a smooth transition onto the return wire.
Step 5: At this point have your 140 denier thread at the return wire. Attach 70 denier white thread onto the return wire and wrap back over the 140 denier thread to tie it off. Stick with edge to edge wraps and work your way back to the rear of the hook until the thread is directly above the point of the mid-point of the barb.


Step 6: “THE TIP” Select a strand of small oval tinsel and attach it to the far side of the hook shank advancing the thread forward rather than rearward. Make 3 turns of small oval tinsel and tie the tag end off on the far side of the hook shank. Making edge to edge wraps, advance your thread forward so it is located above the point of the hook or slightly ahead. This will be our tie in spot for the floss tag. Also trim the tag ends of the tinsel so they stop just shy of this spot. This way we will be able to hide them in the tag, tail, and butt of the fly.


Step 7: “THE TAG” Select a strand of yellow floss and split it in two. I find it easier to tie the strand onto the hook shank, un-spin it slightly, and use a bodkin to separate the strands. Untie the floss to fully separate the strands. Select one strand and tie it in on the near side of the hook shank at the spot mentioned in step 6.
Advance your thread to get it out of the way then wrap the floss back to “the tip” and forward over itself. Stop at the initial tie in spot and unwrap your thread until there is only one turn securing the floss strand, then wrap the thread over the tag ends of floss on the near side of the hook. Let the tag ends extend to the return wire if you still have a little room to smooth out the transition. Wrap the thread back over the floss a turn or two. This will be our tie in spot for the tail.


Step 8: “THE TAIL” Select a small Golden Pheasant Crest feather that has a gentle curve. We don’t want the tip of the tail to sit up too high because it will affect the alignment/height of the wing. Strip off the fuzz and some of the fibers at the base of the stem. Apply some wax to your thread (cobblers wax if you have some on hand) and attach the GP Crest to the top of the hook shank. Two to four wraps are fine and they do not need to be super tight death wraps. Just firm enough to keep the tail in place. Select a small Asian Kingfisher feather and strip of the fluff at the base of the stem. Un-wrap 2-3 turns of thread and mount the kingfisher feather so it lays flat over the tail. Wrap the thread forward using edge to edge wraps binding all tag ands to their respective sides of the hook shank. Your underbody should be finished at this point or darn close. Wrap the thread back to the tail to prepare for the butt.


Step 9: “BUTT” Select some red wool and spin a small amount onto your thread. Make one wrap of dubbing toward the tail, then make the next wrap forward crossing over the previous one….”X” wraps basically. Do this until you create a small “ball” on the hook shank.

Step 10: “TINSEL RIBBING” Select a strand of small oval silver tinsel and attach it to the far side of the hook shank letting the tag end extend just short of the eye of the hook. Wrap your thread forward then wrap the tinsel forward making 5-6 evenly spaced ribs. I used six turns of ribbing, so at the third turn I used a fine tip marker to mark the body hackle tie in spot on the bottom of the hook shank. If you use five turns, make your mark at the second turn of ribbing. Un-wrap the tinsel and then the thread until the tinsel is being held in place by 1 or 2 turns of thread.


Step 11: “BODY TINSEL” Select a long strand of medium flat silver tinsel, prepare and tie it in as shown in my sketches. Wrap your thread forward with edge to edge wraps, binding the tag ends of material, and stop short of the eye of the hook.

Step 12: “BODY” Wrap the flat tinsel forward with edge to edge wraps and nice firm pressure. This is where all the work done to make a smooth underbody pays off. When you get to the mark we made for the body hackle tie spot, stop and attach hemostats to the tip of the flat tinsel and let it hang.


Step 13: “BODY HACKLE” Select a long fibered Ringneck Pheasant rump feather dyed black, and stroke the fibers downward so only the very tip is sticking out. Grab the flat tinsel, un-clamp the hemostats and use the flat tinsel to attach the pheasant rump feather to the bottom of the hook shank. Continue the flat tinsel forward until you finish the body. Make sure there is wax on your thread, tie off the flat tinsel and trim the excess.

Step 14: “Ribbing” Grab the small oval tinsel and rib the body with the number of turns you have selected. When you get to the body hackle make sure the tinsel goes in front of the stem so the hackle will be wrapped along the rear edge of the ribbing. Tie the oval tinsel off at the front of the hook and trim the excess.


Step 15: “BODY HACKLE” Wrap the body hackle forward following the rear edge of the tinsel, tie off at the front of the hook and trim the excess stem.

Step 16: “THROAT” Select a long fibered Ringneck Pheasant rump feather dyed black, and strip off one side of the fibers. While looking at the good side of the feather, strip off the fibers on the left side. Stroke the fibers downward so only the very tip is sticking out. Tie the feather in by the tip and wrap the hackle 2-3 turns. Tie it off and trim the excess stem.

Step 17: “BODY HACKLE and THROAT” At this point use your thumb and forefinger to stroke the fibers downward so they won’t interfere while mounting the wing. A little spit can help control the fibers and keep them in place for the time being.

Step 18: Since the head calls for red thread, I switch to at this time. Wax the thread then attach it to the hook shank, wrap over the previous thread and trim it off.

Step 19: “WING” I am using black Turkey Tail feathers, goose would be a good substitute. Please take a look at the drawings from Pryce-Tannat and take notice of the subtleties. I am going to mount the wings like figure 1, but I want them to lay lower like figure 3. I chose to use approximately 24 fibers for each wing. After clipping the strips of fibers from their respective sides I put them back to back so the good sides are on the outside and the longest fibers should be the top of the wing. Now I use my fingers to align the tips to match the curvature of the tail and also “hump” wing slightly. Giving the wing this slight hump or arc will help to set the wing low and also helps to give a slight “bull” at the front edge of the wing.
Before mounting the wing make sure to wax your thread. Holding the wing strips in my right hand, I position them where I want them to be, then use my thumb and index finger of my left hand to hold them in place. You should be squeezing the wings with enough pressure to keep them in place when mounting them….the fibers should not slip. If they do your wings will have the tendency to explode or pop apart. This hold is sometimes referred to as the “Vulcan Death Grip.”
Make the first wrap of thread, but make sure to wedge it between your fingers before going around the hook shank. Make one more wrap and do the same thing. Both wraps should be loose and shouldn’t be compressing the wing at this point. Let the bobbin hang and grab the butt ends of the wing with your right hand. Using the your right hand, start to compress the fibers directly downward. Pull the bobbin done a touch to engage the thread with the wings, still maintaining a firm left grip. Once the thread loops are on the wing and not between your fingers, let the bobbin hang, and use your right hand to further compress the wings. The weight of the bobbin will help with this step. When you have the wings compressed sufficiently, grab the bobbin and pull the thread straight up to set the wing, then make 2-3 more turns of thread to secure the wing. Use your right hand to align the butt ends with the centerline of the shank. At this point you can let go with your left hand to see how good a job you have done.
If the wing is to your liking, put a few dabs of head cement on the butt ends, just ahead of the tie in point. This will help to keep everything aligned, just be sure not to get any on the finished wing. DO NOT TRIM THE BUTT ENDS AT THIS POINT.
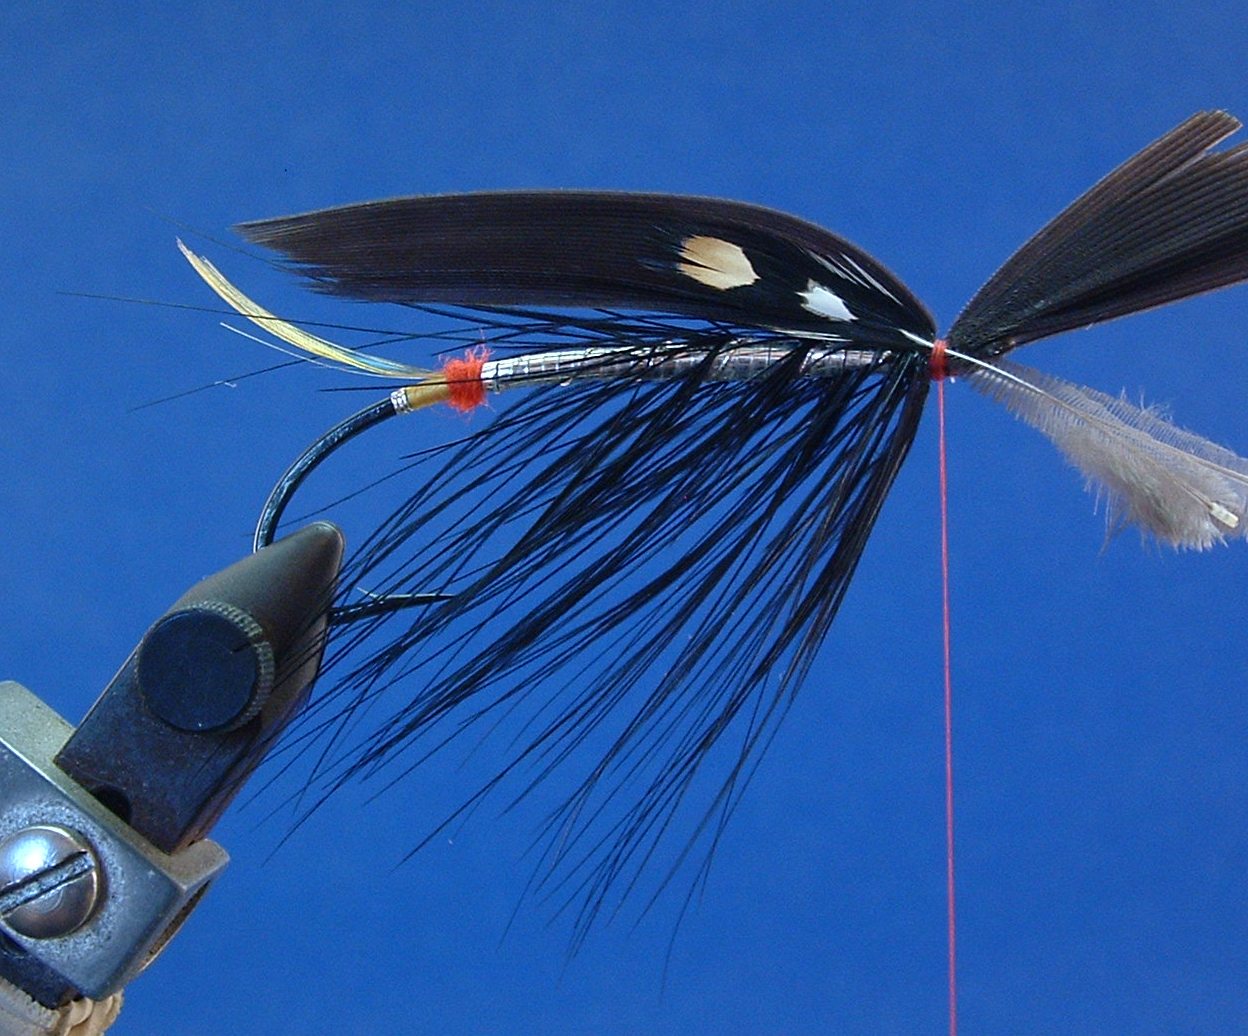

Step 20: “SIDES” Select two matching Jungle Cock nail feathers and trim the fibers off the stem rather than stripping them off. Try to leave some little stubble sticking out from the stem. These will act as outriggers to help prevent the stem from rolling while tying it in. Wax your thread then tie the nails on one at a time and let them extend to the middle of the body. DO NOT TRIM THE BUTT ENDS AT THIS POINT.

Step 21: “CHEEKS” Select two matching kingfisher feathers and trim the fibers off the stem rather than stripping them off. Try to leave some little stubble sticking out from the stem. These will act as outriggers to help prevent the stem from rolling while tying it in. Wax your thread then tie the feathers on one at a time and let them extend over the white “eye” of the jungle cock. You can put a little dab of head cement on the stems if you like, but not too much.


Step 22: Use a double edged shaving razor to trim the butt ends of all the material extending past the eye of the hook. Trim them at a slight angle to help build a taper for the head. Take your time with this step, not only because the razor is sharp, but because we don’t want to push any material out of alignment.

Step 23: “TOPPING” Select a Golden Pheasant crest feather that has the same general curve of the wing. Also, try to make sure the topping/crest feather is straight and is not twisted. To get the nice cascade effect, soak a few toppings that look good in warm water for a half hour or so. Take them out of the water with tweezers and lightly flick off the water. Set them on a flat piece of glass and before they dry, separate the fibers with a bodkin. When they fully dry you should have the “cascade.”
Before mounting the topping, hold it up to the wing to establish the tie in point on the stem. Strip off all the fibers below this point. To put a notch into the stem at the tie in point, use the pad of your forefinger as the base and use your thumbnail to make the notch. Take your time with this, because the stem can roll and we don’t want that to happen. Your thumb and forefinger are the best tools and are much better than using pliers.
Make sure you have your thread waxed and mount the topping to the top of the fly. Try to get the tip of the topping to meet with the tip of the tail. Don’t trim the excess stem.


Step 24: “HORNS” Select two fibers from a Scarlet Macaw tail and make sure they are long enough to extend to the rear of the hook. Turkey or Goose dyed red would be a good substitute. You have two options with the horns; they can go straight back and be parallel to the wing or they can criss cross over the top of the wing. I prefer the latter myself.
Make sure your thread is waxed and tie them on one at a time. When you have them situated how you like, make a few more turns of thread and trim all of the excess butt ends.

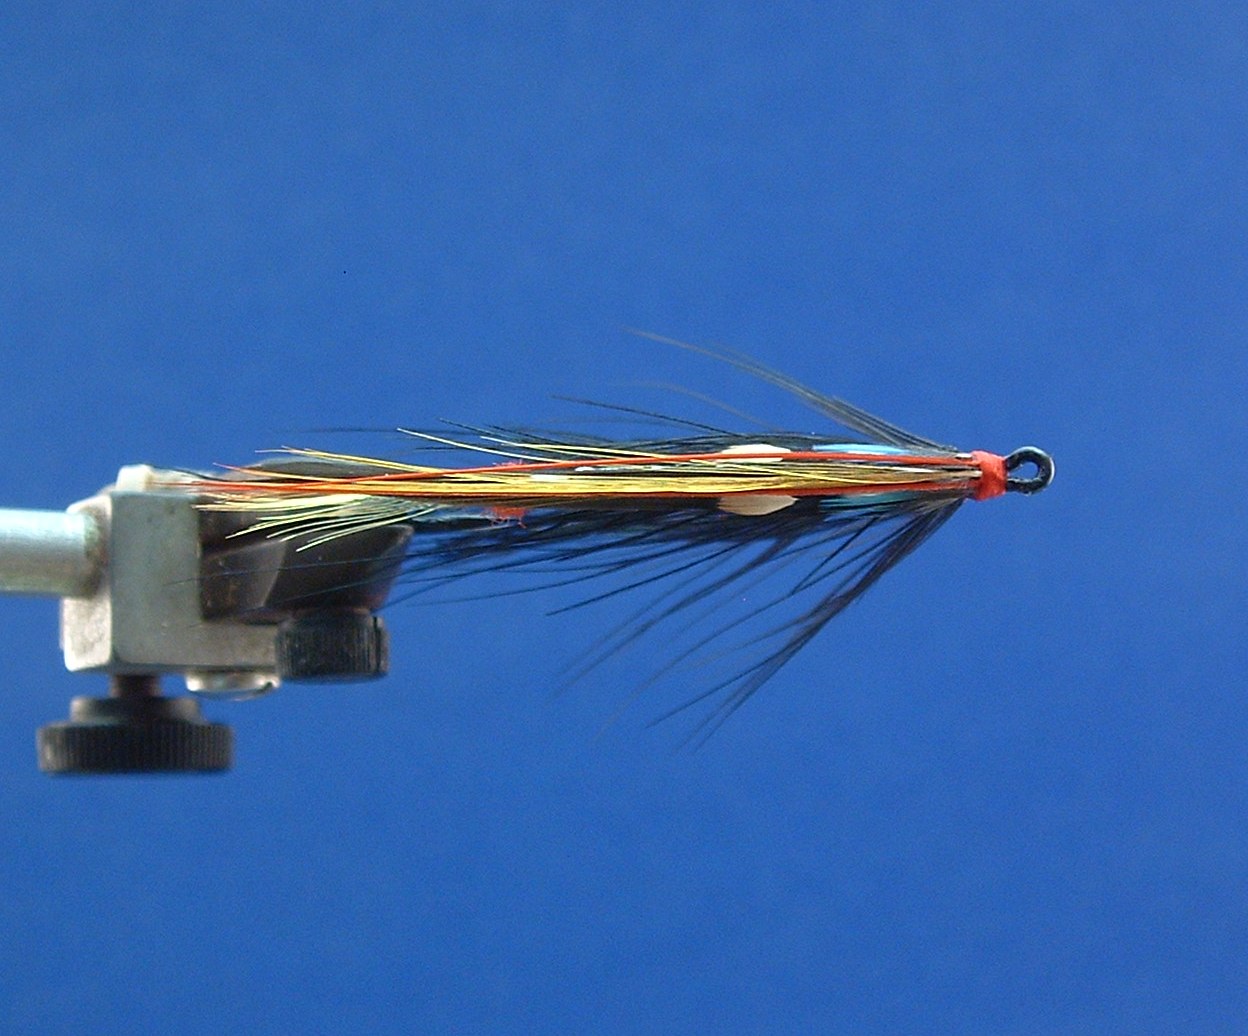

Step 25: Finish forming the head with the red thread and tie it off with a whip finish. Coat the head with thin cement so it will soak into the thread. After this dries, apply thicker “finish” cement or a gloss coat. Let the gloss coat dry and apply another coat or two.


